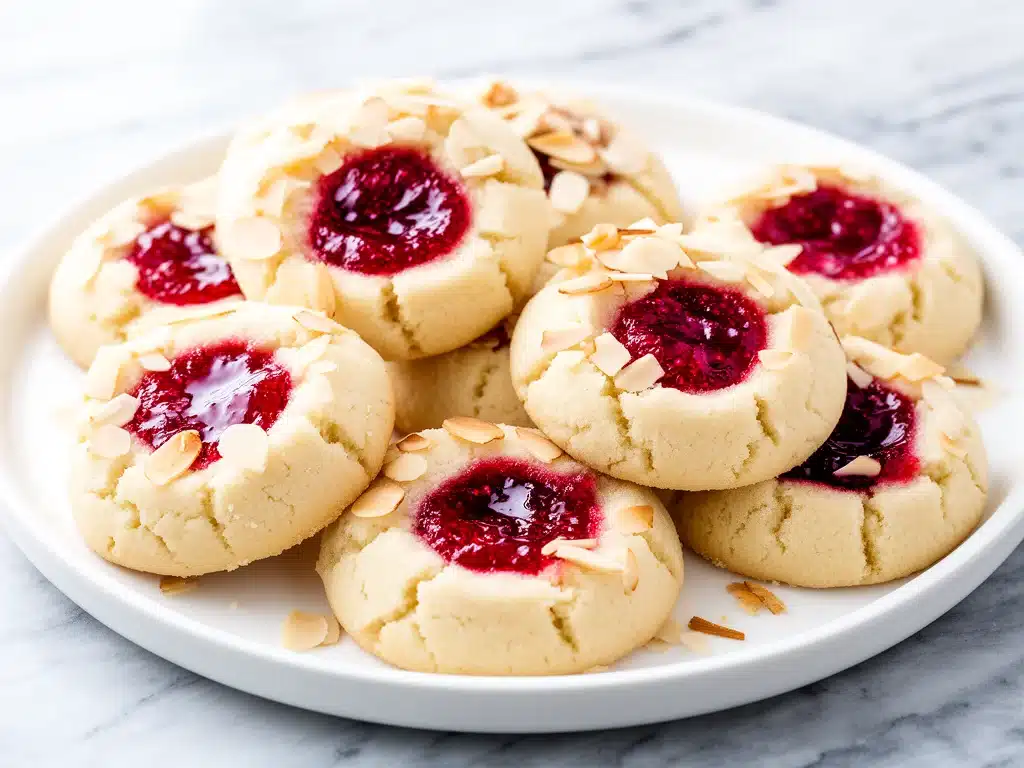
Last Saturday, I was sitting on my kitchen floor, surrounded by a chaotic landscape of flour-dusted counter tops and empty cookie jars. I had promised myself I’d finally master the perfect thumbprint cookie. You know the type—the ones that look like they came from a high-end bakery, with that perfect indented crater filled with vibrant jam and that delicate, crumbly almond crust. The reality? My first batch looked like sad, flat pancakes with jam oozing out the sides like lava. They were delicious, sure, but they weren’t the “impressive” cookies I wanted to bring to my neighbor’s book club.
But here’s the thing about baking: failure is just data collection. I tweaked the butter temperature, I adjusted the flour ratio, and I stopped trying to rush the chilling process. By my third attempt, I had them. Golden edges. A tender, melt-in-your-mouth texture that crumbles just enough to show off that glossy raspberry center. And the best part? They only use five ingredients. Yes, five. Not fifteen. Not obscure ingredients you have to order online. Just butter, sugar, flour, almond extract, and jam.
I’ve made these Raspberry Almond Thumbprint Cookies at least ten times in the last month. I’ve tested them with different jams, different flours, and even different ovens. They are consistently reliable, beautifully elegant, and honestly? They’re easier than most breakfast muffins I make on weekdays. I’m not exaggerating when I say these cookies have replaced my usual go-to dessert. They’re the reason I now volunteer to bring sweets to every gathering. Let me walk you through exactly how to get that bakery-quality result without the stress.
Why You’ll Love This Recipe
There are a lot of cookie recipes out there, but this specific combination of raspberry and almond has a special place in my heart. It’s sophisticated enough for a holiday table but simple enough for a random Tuesday craving. Here’s why this recipe has earned a permanent spot in my rotation:
Stupid Simple Ingredients — Seriously, if you can read a label, you can make these. I’m talking butter, sugar, flour, almond extract, and jam. That’s it. No fancy pastry bags, no complex tempering, no weird chemical leaveners. If you have these items in your pantry right now, you can bake these in the next hour.
Zero Messy Oozing (When Done Right) — The biggest fear with thumbprint cookies is the jam running out during baking. I’ve cracked the code on the perfect consistency and amount of jam so that it stays put, creating that beautiful little jewel-like center. No sticky mess on your baking sheet. Just clean, pretty cookies.
Make-Ahead Friendly — These cookies actually get better after a day or two. The flavors meld, and the texture softens slightly in the best way possible. I love making a double batch on Sunday because it means I have gourmet treats ready for the week. They store beautifully in an airtight container, staying fresh for up to a week.
Impressive Without the Effort — When I serve these, people always ask for the recipe. They assume I spent hours making a complicated dough. But when I tell them it’s five ingredients and 20 minutes of prep, they’re shocked. It’s the ultimate cheat code for looking like a pro baker.
This is my go-to when I need a dessert that just works. No complicated techniques, no weird ingredients, just reliable, delicious food that makes everyone happy. Plus, compared to something like my best Greek yogurt blueberry muffins, these are a little more indulgent but just as easy to pull together when you need a sweet fix.
Ingredients You’ll Need
Here’s the best part: you probably have most of this already. This recipe relies on high-quality basics because there’s nowhere to hide. If your butter is rancid or your almond extract tastes like medicine, you’ll taste it. Here’s what you need to gather:
Unsalted Butter (1 cup / 226g, softened) — This is the foundation. You want it softened to room temperature, but not melted. If you poke it, it should leave an indent but not feel greasy. I use high-fat European-style butter when I have it because the flavor is richer, but standard supermarket butter works perfectly fine too. Softening takes about 30 minutes if you forget to plan ahead.
Granulated Sugar (1 cup / 200g) — Just regular white sugar. Don’t try to substitute with brown sugar here; you want that clean, crisp sweetness to balance the tart raspberry. Brown sugar will make the cookies cakey and dense, which isn’t what we’re going for.
All-Purpose Flour (2 cups / 250g) — The structure comes from the flour. I always sift mine before mixing to ensure there are no lumps, which helps create that delicate, crumbly texture. If you don’t sift, just whisk it vigorously in the bowl. Spoon and level method, please! Don’t scoop directly from the bag, or you’ll pack in too much flour and end up with dry cookies.
Almond Extract (1 teaspoon) — This is the flavor star. Use pure almond extract, not the artificial stuff in the little brown bottles. The difference is night and day. Pure almond extract smells floral and nutty; artificial smells like cough syrup. A little goes a long way, so don’t overdo it, or the cookies will taste soapy.
Raspberry Jam (½ cup / 150g) — I prefer seedless raspberry jam for that smooth, glossy look. Seeds can make the texture gritty and look a bit messy. If you only have seeded jam, just strain it through a fine-mesh sieve to remove the seeds. It takes two minutes and makes a huge difference in the final presentation. Any good quality jam works, but raspberry is classic for a reason.
Pinch of Salt — Just a tiny pinch to balance the sweetness. Don’t skip this!
Optional: Flaky Sea Salt — For finishing. A sprinkle of Maldon salt on top right after baking adds a gorgeous touch and enhances the almond flavor.
Equipment Needed
You don’t need fancy equipment for this. Here’s what I actually use:
Electric Mixer — Handheld or stand mixer. Creaming the butter and sugar by hand is possible, but it takes effort and arm strength. A mixer ensures the butter is aerated properly, which gives the cookies that light, tender crumb.
Mixing Bowls — One large bowl for the wet ingredients and one medium for the dry. I like stainless steel because they’re easy to clean and don’t retain heat.
Measuring Cups and Spoons — Standard stuff. Dollar store versions work fine for liquids and sugar.
Baking Sheets — Two large sheets. I prefer light-colored aluminum pans because dark pans can cause the bottoms to burn too quickly. If you only have dark pans, lower your oven temperature by 25 degrees.
Parchment Paper — Line your baking sheets. Trust me on this. It prevents sticking and makes cleanup a breeze. You don’t need to grease the parchment.
Small Spoon or Thumb — To make the indentations. I use a small measuring spoon (1/2 teaspoon) for uniformity, but my thumb works too if you want that rustic look.
Pastry Brush (Optional) — If you want to brush a little egg wash on the edges for extra shine, but I usually skip this for simplicity.
How to Make It: Step-by-Step

Alright, let’s make these! I’m walking you through exactly how I do it, including the little tricks I’ve picked up over dozens of batches.
Step 1: Prep Your Oven and Pans (2 minutes)
Preheat your oven to 350°F (175°C). This is crucial. If your oven is too cold, the cookies will spread too much before they set. If it’s too hot, they’ll burn. Line your baking sheets with parchment paper. Make sure you have at least two sheets ready so you can rotate them later.
Step 2: Cream the Butter and Sugar (3-4 minutes)
In your large mixing bowl, beat the softened butter and granulated sugar together on medium-high speed. This is where the magic happens. You’re incorporating air into the butter. Keep beating until the mixture looks pale, fluffy, and almost white. This usually takes about 3-4 minutes. Don’t rush this step! If the mixture looks yellow and dense, keep beating. It should look like whipped cream.
Step 3: Add the Almond Extract (30 seconds)
Turn the mixer to low and add the almond extract and the pinch of salt. Mix just until combined. You’ll smell that wonderful almond aroma fill the kitchen. Scrape down the sides of the bowl with a spatula to make sure everything is evenly mixed.
Step 4: Mix in the Flour (1-2 minutes)
Reduce the mixer speed to low. Add the flour gradually. Mix until just combined. You’ll see the dough come together into a soft, slightly sticky ball. Stop mixing as soon as the flour disappears. Overmixing at this stage can develop gluten and make the cookies tough. The dough should hold together when pinched but still feel soft.
Step 5: Chill the Dough (15-20 minutes)
Here’s the secret step most people skip: chill the dough. Wrap the dough in plastic wrap or put it in a covered bowl and refrigerate for 15-20 minutes. This firms up the butter, which prevents the cookies from spreading too thin in the oven. If you skip this, your thumbprints might lose their shape. I know it’s tempting to bake right away, but trust me—this step is non-negotiable for perfect results.
Step 6: Roll and Shape (10 minutes)
Take the chilled dough out of the fridge. Scoop out about 1 tablespoon of dough per cookie (a small ice cream scoop works great for uniformity). Roll them into smooth balls between your palms. Place them on the prepared baking sheets, about 2 inches apart. They will spread slightly, so give them room.
Step 7: Make the Thumbprints (5 minutes)
Using your thumb or the back of a 1/2 teaspoon measuring spoon, press a deep indentation into the center of each ball. Go deep enough to hold the jam, but not so deep that you poke through the bottom. If the dough cracks around the edges, just pinch it back together. It’s not a big deal.
Step 8: Fill with Jam (5 minutes)
Fill each indentation with raspberry jam. Use a small spoon or a piping bag. Don’t overfill! Leave a little rim of dough around the edge. If you overfill, the jam will bubble over and burn. About 1/2 to 1 teaspoon per cookie is perfect. Smooth the top with the back of the spoon.
Step 9: Bake (12-14 minutes)
Place the baking sheets in the oven. Bake for 12-14 minutes, rotating the sheets halfway through for even browning. The cookies are done when the edges are lightly golden and the centers are set. The jam should be bubbly. Do not overbake, or the cookies will be dry. They will firm up as they cool.
Step 10: Cool and Serve (20 minutes)
Let the cookies cool on the baking sheet for 5 minutes, then transfer them to a wire rack to cool completely. This is the hardest part—waiting! But if you try to move them while they’re hot, they’ll break. Once cooled, you can sprinkle with flaky sea salt if you like. They’re ready to eat, store, or gift.
Expert Tips & Tricks
Here’s everything I’ve learned from making these dozens of times. These tips will save you from my mistakes.
Butter Temperature is Key
Your butter must be softened, not melted. If it’s melted, the cookies will spread into flat discs. If it’s too cold, the dough will be crumbly and hard to roll. The ideal texture is like soft clay. If you’re in a hurry, you can soften butter in the microwave for 5-10 second bursts, but watch it closely.
Don’t Skip the Chill
I cannot stress this enough. Chilling the dough prevents spreading. It also makes the dough firmer, so it’s easier to roll into balls and press indents without cracking. If your kitchen is hot, you might even need to chill them for 30 minutes.
Jam Consistency Matters
If your jam is too runny, it will leak out. If it’s too thick, it won’t spread into the indent. I like to microwave the jam for 10-15 seconds to loosen it up slightly before filling. This helps it settle smoothly into the dough without air bubbles.
Uniform Size
Use a cookie scoop or a scale to ensure all cookies are the same size. This ensures they bake evenly. If some are bigger, they’ll take longer to bake, and you’ll end up with some burnt and some undercooked.
Storage for Freshness
Store cookies in an airtight container at room temperature for up to a week. If you live in a humid climate, add a slice of bread to the container to absorb moisture. The cookies stay soft and delicious.
Common Mistakes (and how to avoid them):
Mistake: Cookies are too crumbly
Fix: You likely overmixed the flour or didn’t chill the dough. Next time, mix just until combined and chill for at least 15 minutes.
Mistake: Jam burned on the bottom
Fix: You overfilled the cookies or baked them too long. Use less jam and check them at 12 minutes.
Mistake: Cookies spread too much
Fix: Your butter was too warm or you skipped chilling. Use room temp butter, not melted, and always chill.
Variations & Substitutions
Once you’ve nailed the basic version, here’s how you can mix it up. I’ve tried all of these.
Vanilla Bean Version
Skip the almond extract and use 1 teaspoon of vanilla bean paste instead. Fill with strawberry or apricot jam. This is a classic combination that feels very traditional.
Chocolate Chip Twist
Add 1/2 cup of mini chocolate chips to the dough. Fill with raspberry or orange marmalade. The chocolate and raspberry combo is incredible.
Coconut Almond
Add 1/2 cup of shredded coconut to the dough. Use coconut extract instead of almond. Fill with passion fruit or mango jam for a tropical vibe. This pairs surprisingly well with my creamy coconut lime mocktail for a summer party.
Matcha Green Tea
Add 1 tablespoon of matcha powder to the flour. Fill with white chocolate chip or raspberry. The earthy green tea balances the sweet jam beautifully.
Dietary Modifications:
Gluten-Free — Use a 1:1 gluten-free flour blend. The texture will be slightly more tender, but it works great.
Dairy-Free — Use vegan butter sticks (not tub spreads) and ensure your jam is vegan (some use gelatin). Most jams are vegan, but check the label.
Nut-Free — Skip the almond extract and use vanilla instead. The cookies will still be delicious, just without the nutty flavor.
Serving & Storage
How to Serve:
I usually serve these plain, but they look beautiful dusted with powdered sugar or topped with a flake of sea salt. They pair wonderfully with coffee or tea. I also love serving them alongside a warm brown sugar peach caramel coffee cake for a brunch spread.
Side Dishes:
These are standalone desserts, but they go great with a glass of milk, a cup of tea, or a slice of cheesecake if you’re feeling fancy.
Storage Instructions:
Refrigerator: Not necessary. Store at room temperature in an airtight container for up to a week.
Freezing: Yes! You can freeze the baked cookies for up to 3 months. Thaw at room temperature. You can also freeze the unbaked dough balls. Freeze them on a baking sheet, then transfer to a bag. Bake straight from frozen, adding 1-2 minutes to the bake time.
Pro Tip: If your cookies seem dry after a few days, store them with a slice of apple in the container. The apple releases moisture and softens the cookies overnight.
Nutrition Information
I’m not a nutritionist, but here’s the breakdown if you’re tracking. Please note that these are estimates and can vary based on exact ingredients and portion sizes.
Per Cookie (makes approx. 24 cookies):
- Calories: 110
- Protein: 1g
- Carbs: 14g
- Fiber: 0g
- Sugar: 8g
- Fat: 6g
- Saturated Fat: 4g
- Cholesterol: 15mg
- Sodium: 45mg
What’s Good:
- Small, manageable portion size
- Quick energy from carbs
- Delicious treat without needing a whole cake
What to Know:
- Contains dairy and nuts
- High in sugar and saturated fat (it’s a cookie!)
- Not suitable for vegan or gluten-free diets without modifications
My Take:
Look, these are cookies. They’re meant to be enjoyed. One or two is a perfect treat. If you’re watching your sugar, keep the portion small and pair it with a cup of black coffee to cut the sweetness. But honestly? Life’s too short to stress over 110 calories. Enjoy them!
Final Thoughts
So that’s my go-to raspberry almond thumbprint cookies! I’ve probably talked your ear off at this point, but when you make a recipe this often, you have a lot to say about it. These cookies have saved me more times than I can count. They’re my answer to “what dessert should I bring?” when I’m tired, don’t want takeout, and still want something that tastes really good. My kids are happy, my friends are happy, and I’m happy because I’m not stressed about cooking.
Make it yours! Try different jams, swap in your favorite extracts, adjust the sugar. The best recipes are the ones you adapt to your family’s tastes. If you make this, drop a comment and let me know what you think! I love hearing how recipes turn out in your kitchen. And if something doesn’t work, tell me that too—I’m here to help troubleshoot.
Happy baking! And I hope your kitchen smells half as good as mine does right now.
Frequently Asked Questions
Can I use jelly instead of jam?
Yes, you can! Jelly works well because it’s smoother and less likely to have seeds. Fruit preserves work too, but they might be chunkier, which can affect the look. If you use preserves, chop the fruit finely first. I personally prefer jam for that glossy, jewel-like appearance, but jelly is a great backup.
Why did my cookies spread too much?
This usually happens for one of three reasons: the butter was too warm (melted), you didn’t chill the dough, or your oven wasn’t preheated enough. Make sure your butter is soft but not greasy, chill the dough for at least 15 minutes, and always preheat your oven. Also, make sure you’re not over-creaming the butter and sugar, which can incorporate too much air and cause spreading.
Can I make these gluten-free?
Absolutely! Use a 1:1 gluten-free all-purpose flour blend. The texture might be slightly more tender or crumbly, but the flavor remains the same. I’ve used Bob’s Red Mill and King Arthur Gluten-Free flour blends with great success. Just make sure your almond extract and jam are certified gluten-free if you have celiac disease.
How do I store leftover cookies?
Store them in an airtight container at room temperature for up to a week. If you live in a humid area, add a silica packet or a slice of bread to absorb moisture. Do not refrigerate them, as this can make them hard and stale. For long-term storage, freeze them in a freezer-safe bag for up to 3 months.
Can I freeze the dough?
Yes! Scoop the dough into balls, freeze them on a baking sheet until solid, then transfer to a freezer bag. You can bake them straight from frozen, just add 1-2 minutes to the bake time. This is a great way to have ready-to-bake cookies on hand for last-minute guests.
Can I use almond meal instead of flour?
No, almond meal has a different fat content and texture. It will make the cookies greasy and dense. You need all-purpose flour for the structure. If you want an almond flavor, stick with the almond extract. If you need a nut-free version, use vanilla extract instead.
Why did the jam leak out of my cookies?
This happens if you overfill the indentations or if the jam is too runny. Use about 1/2 to 1 teaspoon of jam per cookie. If your jam is thin, thicken it slightly by simmering it on the stove for a few minutes or adding a teaspoon of cornstarch. Also, make sure you’re not pressing the indent too deep, which can create a hole that leaks.
Pin This Recipe!


Raspberry Almond Thumbprint Cookies
- Total Time: 35 minutes
- Yield: 24 cookies 1x
Description
These easy 5-ingredient homemade thumbprint cookies feature a delicate, crumbly almond crust filled with vibrant raspberry jam. They are sophisticated enough for holidays but simple enough for a Tuesday craving, requiring just butter, sugar, flour, almond extract, and jam.
Ingredients
- 1 cup (226g) unsalted butter, softened to room temperature
- 1 cup (200g) granulated sugar
- 2 cups (250g) all-purpose flour, sifted
- 1 teaspoon pure almond extract
- 1/2 cup (150g) seedless raspberry jam
- Pinch of salt
- Flaky sea salt (optional, for finishing)
Instructions
- Preheat oven to 350°F (175°C) and line two large baking sheets with parchment paper.
- In a large mixing bowl, beat the softened butter and granulated sugar on medium-high speed for 3-4 minutes until pale, fluffy, and almost white.
- Turn mixer to low and add the almond extract and pinch of salt. Mix just until combined, then scrape down the sides of the bowl.
- Reduce mixer speed to low and gradually add the flour. Mix until just combined to form a soft, slightly sticky dough. Do not overmix.
- Wrap the dough in plastic wrap or place in a covered bowl and refrigerate for 15-20 minutes to firm up the butter.
- Scoop about 1 tablespoon of dough per cookie and roll into smooth balls. Place on prepared baking sheets, 2 inches apart.
- Using your thumb or the back of a 1/2 teaspoon measuring spoon, press a deep indentation into the center of each ball.
- Fill each indentation with about 1/2 to 1 teaspoon of raspberry jam. Smooth the top with the back of the spoon.
- Bake for 12-14 minutes, rotating sheets halfway through, until edges are lightly golden and centers are set.
- Let cookies cool on the baking sheet for 5 minutes, then transfer to a wire rack to cool completely. Sprinkle with flaky sea salt if desired.
Notes
Ensure butter is softened but not melted to prevent spreading. Chilling the dough is crucial for maintaining the thumbprint shape. Use seedless jam for a smooth, glossy look. Cookies can be stored in an airtight container at room temperature for up to a week or frozen for up to 3 months.
- Prep Time: 20 minutes
- Cook Time: 12-14 minutes
- Category: Dessert
- Cuisine: American
Nutrition
- Serving Size: 1 cookie
- Calories: 110
- Sugar: 8
- Sodium: 45
- Fat: 6
- Saturated Fat: 4
- Carbohydrates: 14
- Protein: 1
Keywords: thumbprint cookies, raspberry almond cookies, easy dessert, 5 ingredient cookies, homemade cookies, holiday baking, make ahead dessert