I still remember the first time I made a crumble. It was August, the air was thick and humid, and I had just come home from the farmers market with a bag of plums that were so ripe they were practically leaking juice through the paper bag. I didn’t have a plan. I didn’t have a fancy recipe. I just had a box of oats, some flour, butter, and a desperate need to use up those fruit before they turned to mush.
I threw everything together in a bowl, dumped it into a baking dish, and put it in the oven. When it came out twenty minutes later, the kitchen smelled like caramelized sugar and warm fruit. I took one bite and realized that store-bought desserts have no soul. They’re cold, they’re uniform, and they don’t have that rustic, imperfect charm that comes from a home kitchen.
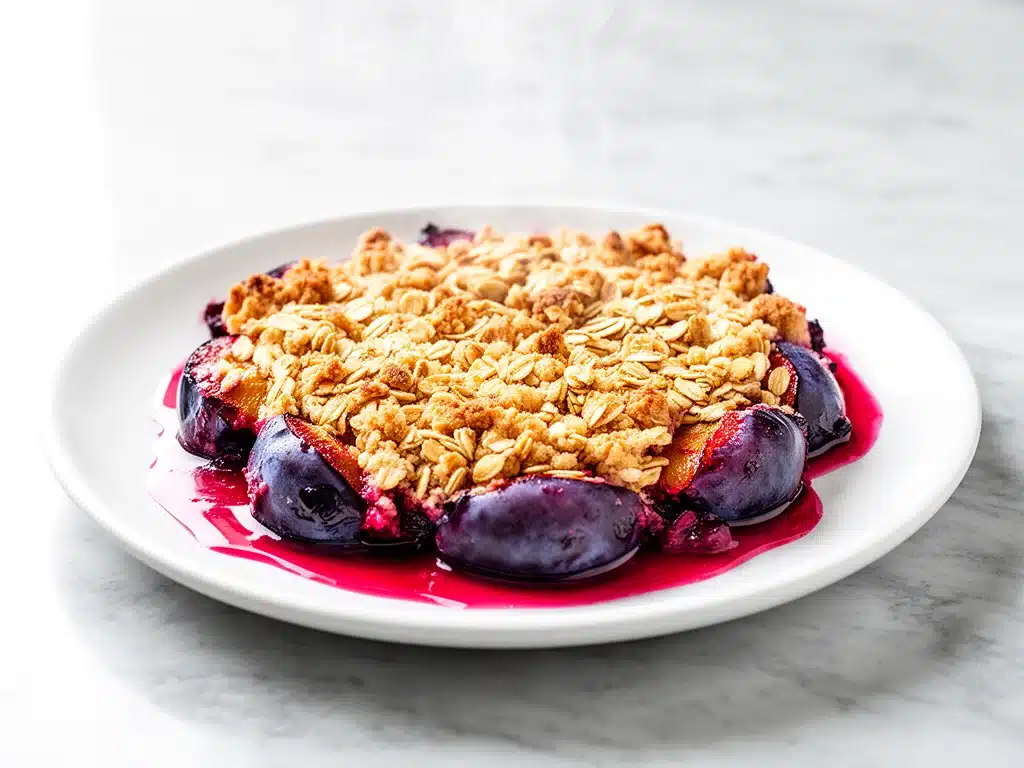
That accidental Tuesday dinner turned into a habit. Now, when summer plums hit their peak, I’m the first one at the market. This fresh plum crumble with oat topping has become my go-to way to say “thanks” to the season. It’s not just a dessert; it’s a hug in a bowl. And the best part? It’s stupidly easy. You don’t need to be a pastry chef to make this. You just need a few basic ingredients and a willingness to let the oven do the work.
I’ve made this recipe dozens of times—sometimes with purple plums, sometimes with yellow ones, sometimes when I’m feeling lazy and skip the cinnamon. Every single time, it turns out better than anything I’ve ever bought at a bakery. It’s crispy on top, soft and tangy underneath, and it always impresses people who think baking is hard. So, let me walk you through exactly how to make it. I’m sharing all my secrets, including the one trick that keeps the topping from getting soggy.
Why You’ll Love This Fresh Plum Crumble
There are about ten reasons I keep making this plum crumble, but here are the big ones that will win you over.
- Zero Skill Required — Seriously, if you can dump ingredients into a bowl, you can make this. I’ve made this while holding a toddler on my hip. It’s that simple. No rolling pins, no pie crusts, no tempering chocolate. Just mix, dump, and bake.
- Ready in Under 45 Minutes — From preheating the oven to taking the first bite, you’re looking at about 40 minutes. That’s faster than ordering takeout and waiting for delivery. I make this on weeknights when I need something sweet but don’t have hours to spare.
- Pantry-Friendly Ingredients — You probably have 90% of the ingredients for the oat topping already. Flour, oats, butter, sugar. The only thing you need to buy is the plums. If you don’t have fresh plums, frozen ones work too (just thaw and drain first).
- Seasonal Magic — This isn’t just a recipe; it’s a celebration of summer. There’s something deeply satisfying about eating fruit at its absolute peak. The tartness of the plum cuts through the sweet, buttery topping in a way that feels luxurious but tastes honest.
- Makes Amazing Leftovers — Actually, it’s better the next day. The flavors meld together, the plums get even softer, and the topping stays crisp if you reheat it gently. I deliberately make extra for breakfast with a dollop of Greek yogurt. (If you like sweet breakfasts, you might also enjoy my best Greek yogurt blueberry muffins—they’re a great companion to this crumble.)
- Budget-Smart — When plums are in season, they’re cheap. A few dollars worth of fruit can feed a family of four with seconds to spare. It’s a fraction of the cost of buying dessert at a restaurant.
This is my go-to when I need to impress guests without spending hours in the kitchen. It looks rustic and elegant at the same time. No one suspects it took me less time than it takes to wash the dishes.
Ingredients You’ll Need
Here’s the best part: you probably have most of this already. I’m particular about three ingredients here, and I’ll tell you exactly why.
For the Plum Filling
Fresh plums (4-5 medium, about 1.5 lbs / 680g) — This is the star. Use ripe but firm plums. If they’re too mushy, they’ll turn to jam. If they’re too hard, they won’t soften. Look for plums that give slightly to pressure. I prefer dark purple plums for their tartness, but yellow or red ones work too. Pit and slice them into wedges about ½ inch thick.
Granulated sugar (¼ cup / 50g) — Plums are tart, so they need some sweetness. If your plums are super ripe and sweet, you can cut this down to 2 tablespoons. I like to taste a plum first before deciding.
Lemon juice (1 tablespoon / 15ml) — This brightens the flavor and prevents the plums from browning. It also adds a nice tang that balances the sugar. Don’t skip it—it’s the secret to keeping the flavor fresh.
Cornstarch (1 tablespoon / 8g) — This thickens the juices so you don’t end up with a soupy mess at the bottom of the dish. If you don’t have cornstarch, arrowroot powder or tapioca starch works too. Just use the same amount.
Cinnamon (½ teaspoon / 1g) — Optional, but highly recommended. It adds warmth and makes the kitchen smell like autumn, even in summer. If you don’t like cinnamon, try a pinch of nutmeg or cardamom.
Vanilla extract (1 teaspoon / 5ml) — Just a splash. It rounds out the flavors and makes everything taste more complex.
For the Oat Topping
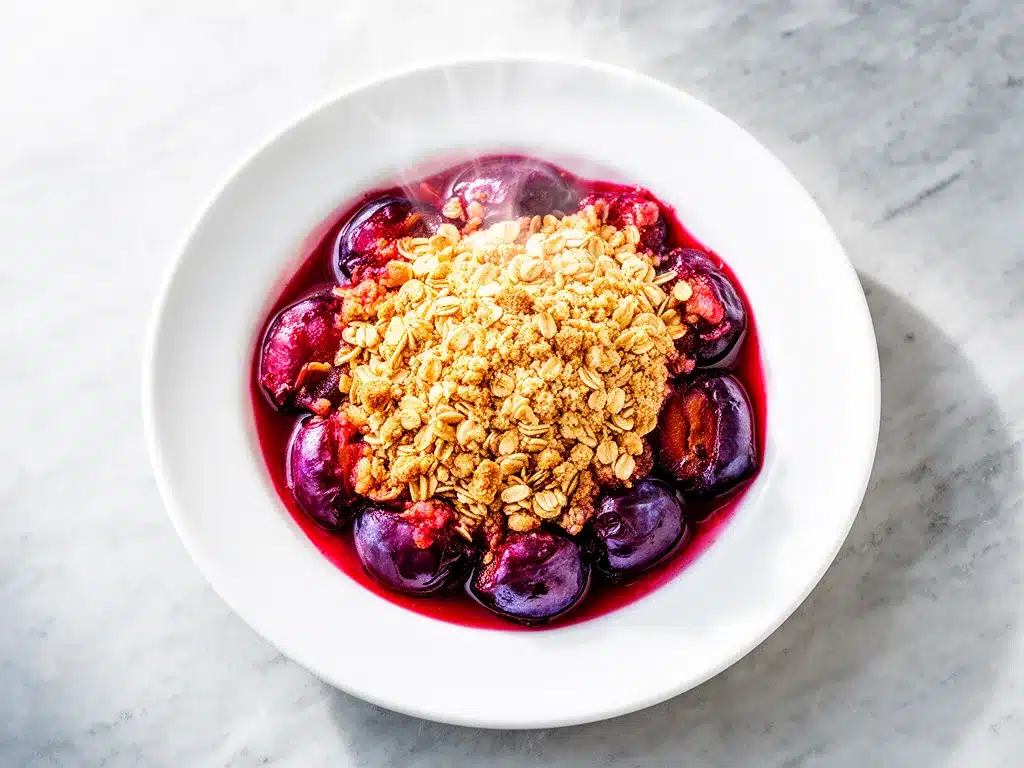
Old-fashioned rolled oats (1 cup / 90g) — Do not use quick oats or steel-cut oats. Old-fashioned oats have the right texture—they stay crunchy but soften just enough to be pleasant. Quick oats will turn into mush.
All-purpose flour (½ cup / 65g) — This binds the topping together so it forms those beautiful clumps. If you’re gluten-free, use a 1:1 gluten-free flour blend.
Brown sugar (½ cup / 100g, packed) — This adds moisture and a caramel-like depth. Light or dark brown sugar both work. I prefer dark for a richer flavor.
Unsalted butter (½ cup / 115g, cold and cubed) — This is crucial. Cold butter creates flaky, crispy bits. If you use melted butter, the topping will be more like a cake. Cube the butter and keep it in the fridge until the last minute.
Pinch of salt (¼ teaspoon / 1.5g) — Salt enhances the sweetness and balances the flavors. Don’t skip it.
Optional add-ins — I sometimes toss in ¼ cup of chopped pecans or walnuts for extra crunch. It’s not traditional, but it’s delicious. If you have leftover nuts from another recipe, this is a great way to use them.
Equipment Needed
You don’t need fancy equipment for this. Here’s what I actually use.
- 9-inch baking dish — A square or round dish works fine. I use a ceramic baking dish because it heats evenly. Glass works too, but watch the baking time—it might cook faster.
- Mixing bowls — Two bowls. One for the plums, one for the topping. Any size will do.
- Peeler or knife — To peel the plums if you prefer. I leave the skin on for color and nutrients, but some people find the skin tough. Your call.
- Fork or pastry cutter — To mix the topping. A fork works perfectly fine. You don’t need a fancy pastry blender.
- Spatula — For stirring the plums and scraping the bowl.
That’s it. No stand mixer, no food processor, no specialized tools. Just basic kitchen stuff.
How to Make It: Step-by-Step
Alright, let’s make this! I’m walking you through exactly how I do it, including the little tricks I’ve picked up over the years.
Step 1: Prep Your Oven and Dish (2 minutes)
Preheat your oven to 375°F (190°C). Grease your 9-inch baking dish with a little butter or non-stick spray. I like to use a bit of butter because it adds flavor. If you’re worried about sticking, line the bottom with parchment paper, but it’s not strictly necessary.
Step 2: Prepare the Plums (5 minutes)
Wash the plums and slice them into wedges. Remove the pits. If you’re peeling them, do it now. Toss the plum slices in a large bowl with the granulated sugar, lemon juice, cornstarch, cinnamon, and vanilla. Mix gently until the plums are evenly coated. The sugar will start to draw out the juices, which is exactly what you want. Let this sit for 10 minutes while you make the topping. This step is crucial—it helps the plums release their juices so they cook down into a luscious sauce.
Step 3: Make the Oat Topping (5 minutes)
In a separate bowl, combine the oats, flour, brown sugar, and salt. Cut the cold butter into the dry ingredients. Use your fingers, a fork, or a pastry cutter to work the butter into the mixture. You’re looking for a crumbly texture with some larger clumps. Don’t overmix—it should look like coarse sand with pebbles. Those clumps are what make the topping crispy. If the butter is too warm, pop the bowl in the fridge for 5 minutes.
Step 4: Assemble the Crumble (2 minutes)
Pour the plum mixture into your prepared baking dish. Spread it out evenly. Then, sprinkle the oat topping over the plums. Don’t press it down—just let it sit on top. You want air pockets so it bakes up crispy. If you have nuts, scatter them over the top now.
Step 5: Bake Until Golden (30-35 minutes)
Place the dish in the preheated oven. Bake for 30-35 minutes. You’ll know it’s done when the topping is golden brown and the plums are bubbling up through the cracks. The juices should be thick and syrupy, not watery. If the topping is browning too fast, cover it loosely with foil for the last 10 minutes.
Step 6: Cool and Serve (10 minutes)
Let the crumble cool for at least 10 minutes before serving. This allows the juices to thicken a bit more. If you cut into it immediately, it’ll be soupy. Serve warm with a scoop of vanilla ice cream, a dollop of whipped cream, or a spoonful of thick Greek yogurt. I love it with a drizzle of honey too.
Total Time: About 40 minutes (10 minutes prep, 30 minutes bake).
Expert Tips & Tricks
Here’s everything I’ve learned from making this dozens of times. These tips will save you from my mistakes.
Use Cold Butter
I can’t stress this enough. Cold butter is the key to a crispy, flaky topping. If the butter melts into the flour before it hits the oven, you get a dense, cake-like crust. Cube the butter and keep it cold until the last second. If your kitchen is hot, even put the bowl of dry ingredients in the fridge for a few minutes before adding the butter.
Don’t Skip the Resting Time
Letting the plums sit with the sugar for 10 minutes isn’t just a suggestion. It draws out the juices, which means less water in the final dish and more concentrated flavor. If you rush this step, your crumble might be watery.
Watch the Baking Time
Ovens vary. Start checking at 30 minutes. Look for bubbling juices and a golden top. If the top is brown but the plums aren’t soft, cover with foil and bake for another 5-10 minutes. Undercooked plums are tart and hard. Overcooked plums are mush.
Gluten-Free Option
I’ve made this gluten-free using a 1:1 flour blend and certified gluten-free oats. It works beautifully. Just make sure your oats are labeled gluten-free, as regular oats can be cross-contaminated.
Common Mistakes
- Soggy bottom — This happens if the plums release too much water. Using cornstarch helps, but also make sure you’re not using plums that are too overripe. They break down too much.
- Dry topping — If your topping is dry and crumbly, you didn’t use enough butter. The butter should coat the flour and oats thoroughly.
- Raw oats — If the oats taste raw, you didn’t bake it long enough. Oats need time to toast and soften. Stick to the full 30-35 minutes.
Variations & Substitutions
Once you’ve nailed the basic version, here’s how you can mix it up. I’ve tried all of these.
Other Fruit Options
This recipe works with almost any stone fruit or berry. Try it with peaches, nectarines, or apricots. If you use berries (like blueberries or raspberries), reduce the sugar by 2 tablespoons since berries are often sweeter. I also love this with a mix of plums and apples—adds a nice crunch.
Spice Variations
Instead of cinnamon, try cardamom for a floral note, or use pumpkin pie spice for a warm, complex flavor. If you like heat, add a pinch of cayenne pepper. It sounds weird, but it enhances the fruit flavor.
Nutty Topping
Add ¼ cup of chopped pecans, walnuts, or almonds to the topping. Toast the nuts in a dry pan for 2 minutes before adding them for extra flavor. It adds a nice textural contrast.
Dairy-Free Version
Replace the butter with cold coconut oil or a vegan butter stick. Use maple syrup instead of brown sugar if you want a different flavor profile. It’s still delicious, though the texture might be slightly denser.
Make-Ahead Strategy
You can prep the plums and topping separately and store them in the fridge for up to 24 hours. Assemble and bake when ready. This is great for dinner parties—you can prep in the morning and bake right before guests arrive.
Serving & Storage
How to Serve
I usually serve this straight from the baking dish at the dinner table—it looks rustic and stays warm. But here are other ways I’ve enjoyed it:
- With Ice Cream — Vanilla bean ice cream is classic. The cold cream contrasts with the warm fruit.
- With Whipped Cream — Homemade whipped cream is nice, but store-bought works in a pinch.
- With Greek Yogurt — For a slightly healthier option, use thick Greek yogurt. It adds protein and tang.
- With Coffee — This is my favorite breakfast topping. Spoon it over oatmeal or eat it with a spoon alongside a hot cup of coffee.
Storage Instructions
Refrigerator: Store leftovers in an airtight container for up to 4 days. The topping will soften in the fridge, which is normal.
Reheating: Best method: Reheat in the oven at 350°F (175°C) for 10-15 minutes. This restores the crispiness of the topping. Microwave works but makes the topping soggy. If you microwave, do it in short bursts and don’t expect it to stay crunchy.
Freezing: I don’t recommend freezing this. The texture of the oats and plums changes when thawed. It’s best made fresh.
Pro Tip
If you’re serving this to guests, make two small dishes instead of one big one. It’s easier to serve and looks more elegant. Plus, you can offer different toppings like honey, caramel sauce, or different ice creams.
Nutrition Information
I’m not a nutritionist, but here’s the breakdown if you’re tracking. This is a rich dessert, so portion control is key.
Per Serving (based on 6 servings):
| Nutrient | Amount |
|---|---|
| Calories | 320 |
| Protein | 4g |
| Carbs | 45g |
| Fiber | 3g |
| Sugar | 32g |
| Fat | 14g |
| Saturated Fat | 8g |
| Sodium | 120mg |
What’s Good: The oats provide fiber and whole grains. The plums offer vitamins and antioxidants. It’s a better choice than many baked desserts because of the fruit content.
What to Know: It’s high in sugar from the plums and brown sugar. If you’re watching sugar, reduce the brown sugar to ¼ cup and use less sweet plums. It’s still delicious, just less sweet.
My Take: Look, this is a dessert. It’s meant to be enjoyed. Don’t stress the calories. Pair it with a cup of tea or coffee, and enjoy a modest portion. Life is too short to skip dessert.
Final Thoughts
So that’s my fresh plum crumble with oat topping! I’ve probably talked your ear off at this point, but when you make a recipe this often, you have a lot to say about it.
This has saved summer evenings more times than I can count. It’s my answer to “what’s for dessert” when I’m tired, don’t want to go out, and still want something that tastes really good. My kids are happy, my friends are impressed, and I’m happy because I’m not stressed about cooking.
Make it yours! Try different fruits, swap in your favorite nuts, adjust the spices. The best recipes are the ones you adapt to your family’s tastes. If you make this, drop a comment and let me know what you think! I love hearing how recipes turn out in your kitchen. And if something doesn’t work, tell me that too—I’m here to help troubleshoot.
Happy baking! And I hope your kitchen smells half as good as mine does right now.
Frequently Asked Questions
Can I use frozen plums?
Yes, you can! But you need to thaw them first and drain off the excess liquid. Frozen plums release a lot of water, so you might need to add an extra tablespoon of cornstarch. Pat them dry with a paper towel before mixing with sugar. It works well in a pinch, but fresh plums always taste better.
Why did my crumble turn out watery?
This usually happens if the plums were too ripe or if you didn’t use enough cornstarch. Plums vary in water content. If your plums are very juicy, add an extra teaspoon of cornstarch. Also, make sure you let the plums sit with the sugar for 10 minutes before baking—that helps draw out the juice so it can thicken properly.
Can I make this ahead of time?
You can prep it ahead, but don’t bake it too early. Assemble the crumble and store it in the fridge for up to 24 hours. When you’re ready to serve, take it out and let it sit at room temperature for 20 minutes before baking. This helps it bake more evenly. Baking it the day before and reheating works, but the topping loses some crispiness.
What’s the difference between a crumble and a crisp?
It’s mostly semantics. A crumble usually has a topping with oats and nuts, while a crisp might have more flour and less oats. But honestly, everyone uses the terms interchangeably. My recipe uses oats, so it’s technically a crumble, but it’s crispy on top, so it’s also a crisp. Don’t overthink it—just call it a delicious dessert.
Can I use apples instead of plums?
Absolutely. This recipe is very versatile. If you use apples, peel and slice them thinly. You might need to add a little extra sugar since apples can be less sweet than ripe plums. Apple crumble is a classic for a reason. I also love this with a mix of plums and apples—best of both worlds.
How do I store leftovers?
Store in an airtight container in the fridge for up to 4 days. The topping will soften, but you can reheat it in the oven to crisp it back up. Do not freeze it—the texture of the oats and fruit doesn’t hold up well to freezing.
Can I make this gluten-free?
Yes! Use a 1:1 gluten-free flour blend and make sure your oats are certified gluten-free. The rest of the ingredients are naturally gluten-free. The texture might be slightly denser, but it’s still delicious. I’ve made this for gluten-free friends, and they’ve loved it.
Pin This Recipe!
Fresh Plum Crumble with Oat Topping
- Total Time: 40 minutes
- Yield: 6 servings 1x
Description
A rustic, easy-to-make dessert featuring juicy tart plums topped with a crispy, buttery oat crumble. This recipe requires zero pastry skills and comes together in under 45 minutes.
Ingredients
- 4–5 medium fresh plums (about 1.5 lbs / 680g), pitted and sliced into ½ inch wedges
- ¼ cup granulated sugar (50g)
- 1 tablespoon lemon juice (15ml)
- 1 tablespoon cornstarch (8g)
- ½ teaspoon cinnamon (1g)
- 1 teaspoon vanilla extract (5ml)
- 1 cup old-fashioned rolled oats (90g)
- ½ cup all-purpose flour (65g)
- ½ cup packed brown sugar (100g)
- ½ cup unsalted butter (115g), cold and cubed
- ¼ teaspoon salt (1.5g)
- Optional: ¼ cup chopped pecans or walnuts
Instructions
- Preheat oven to 375°F (190°C). Grease a 9-inch baking dish with butter or non-stick spray.
- In a large bowl, toss sliced plums with granulated sugar, lemon juice, cornstarch, cinnamon, and vanilla. Let sit for 10 minutes to draw out juices.
- In a separate bowl, combine oats, flour, brown sugar, and salt. Cut in the cold cubed butter using fingers, a fork, or pastry cutter until the mixture resembles coarse sand with some larger clumps.
- Pour the plum mixture into the prepared baking dish and spread evenly. Sprinkle the oat topping over the plums without pressing down. Add nuts if using.
- Bake for 30-35 minutes until the topping is golden brown and the plum juices are bubbling and thick. Cover loosely with foil if the topping browns too quickly.
- Let cool for at least 10 minutes before serving to allow juices to thicken. Serve warm with ice cream, whipped cream, or Greek yogurt.
Notes
Use cold butter for a flaky topping. Let plums rest with sugar to prevent a watery crumble. For gluten-free, use 1:1 GF flour blend and certified GF oats. For dairy-free, substitute butter with cold coconut oil or vegan butter. Do not freeze as texture suffers.
- Prep Time: 10 minutes
- Cook Time: 30 minutes
- Category: Dessert
- Cuisine: American
Nutrition
- Serving Size: 1 slice
- Calories: 320
- Sugar: 32
- Sodium: 120
- Fat: 14
- Saturated Fat: 8
- Carbohydrates: 45
- Fiber: 3
- Protein: 4
Keywords: plum crumble, oat topping, easy dessert, summer fruit, gluten-free option, rustic baking, quick dessert